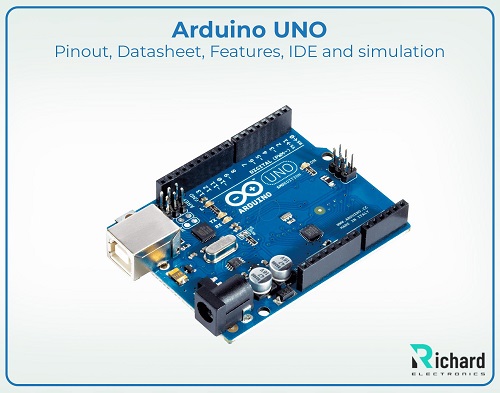
Arduino UNO(A000066)has a dwell Atmega328 microcontroller,  a USB interface, 6 analog pins, and 14 digital pins. SPI, serial, and 12C are three different communication protocols supported by Arduino UNO. Let’s start our detailed discussion and inspect Arduino UNO, including its pinout, features, simulation, datasheet, and programming environment (IDE).
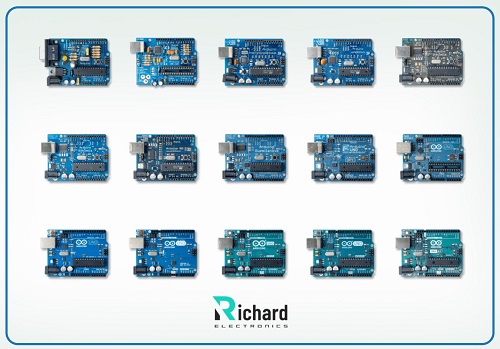
History of Arduino UNO:
The inception of the Arduino uno was pursued in 2003 in Lvera, IDII (Interaction Design Institute Lvera), Italy. At that time, professors(and students) feel the need for easy-to-use affordable microcontroller boards for developing embedded prototypes. Later in 2005, David Cuartielles, Tom Lgoe, Massimo Banzi, and Gianluca Martino started working on designing a new microcontroller board with multiple embedded features and was named “Arduinoâ€. The main purpose of this project is:
â—Â Plug and play board. (Driver installation required)
â—Â Easy to program.
â—Â Useful for all beginners as well as advanced users.
â—Â Affordable.
â—Â Compact Design
Developments in Arduino UNO with time:
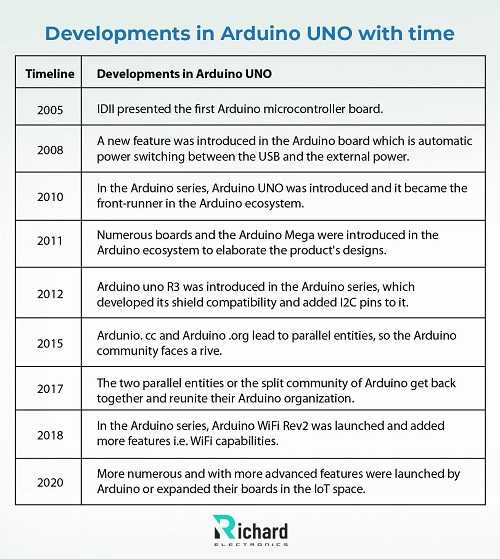
Timeline | Â Â Â Â Developments in Arduino UNO |
2005 | IDII presented the first Arduino microcontroller board. |
2008 | A new feature was introduced in the Arduino board which is automatic power switching between the USB and the external power. |
2010 | In the Arduino series, Arduino UNO was introduced and it became the front-runner in the Arduino ecosystem. |
2011 | Numerous boards and the Arduino Mega were introduced in the Arduino ecosystem to elaborate the product's designs. |
2012 | Arduino uno R3 was introduced in the Arduino series, which developed its shield compatibility and added I2C pins to it. |
2015 | Ardunio. cc and Arduino .org lead to parallel entities, so the Arduino community faces a rive. |
2017 | The two parallel entities or the split community of Arduino get back together and reunite their Arduino organization. |
2018 | In the Arduino series, Arduino WiFi Rev2 was launched and added more features i.e. WiFi capabilities. |
2020 | More numerous and with more advanced features were launched by Arduino or expanded their boards in the IoT space. |
Arduino UNO Features:
Arduino Uno is an open-source microcontroller board, based on Atmega328p, and is used for designing different electronics projects. Arduino Uno is a single-board microcontroller with numerous easy-to-use features so it is widely used by engineering students, designers, hobbyists and beginners. This single-board microcontroller consists of analog inputs, communication capabilities, and 14 digital pins, so it can be suitably used in numerous applications like robotics, sensor networks, IoT, and more. The main aspects and features of the developed Arduino Uno are given there:
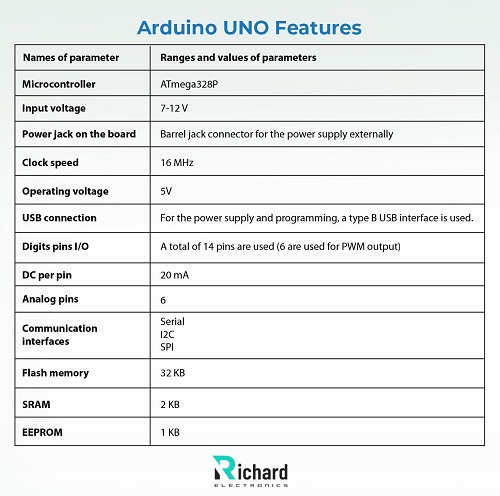
Names of parameter | Â Â Â Â Â Â Ranges and values of parameters |
Microcontroller | ATmega328P |
Input voltage | 7-12 V |
Power jack on the board | Barrel jack connector for the power supply externally |
Clock speed | 16 MHz |
Operating voltage | 5V |
USB connection | For the power supply and programming, a type B USB interface is used. |
Digits pins I/O | A total of 14 pins are used (6 are used for PWM output) |
DC per pin | 20 mA |
Analog pins | 6 |
Communication interfaces | Serial I2C SPI |
Flash memory | 32 KB |
SRAM | 2 KB |
EEPROM | 1 KB |
Arduino UNO Datasheet:
The heart of Arduino UNO is ATmega328P, an 8-bit microcontroller developed by Microchip (Atmel). It is essential to understand the features and specifications for launching/developing different efficient applications. Download the Arduino UNO datasheet by clicking the below button:
Download Arduino UNO Datasheet
Arduino UNO Key Aspects
Some major key aspects of the Arduino UNO (ATmega328P) datasheet are given there:
â—Â Memory
â—Â Timers
â—Â Core architectures
â—Â Operating conditions
â—Â I/O ports
â—Â Communication interference
Memory:
â–Â EEPROM: For the non-volatile storage 1 KB can be used so the data can be retained also when it can be powered off.
â–Â Flash memory: For program storage 32 KB, and 0.5 KB taciturn for bootloader.
â–Â SRAM: for data storage dynamically 2KB can be used.
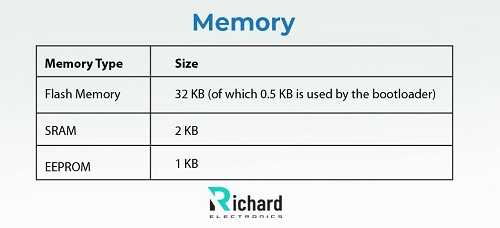
Memory Type | Size |
Flash Memory | 32 KB (of which 0.5 KB is used by the bootloader) |
SRAM | 2 KB |
EEPROM | 1 KB |
Â
Timers:
â–Â Timer 1: For PWM generation or the crucial timing operation, the 16-bit timer can be used.
â–Â Timer 0 - timer 2: For PWM and time-based operations, 8-bit timers can be used.
Core architecture:
â–Â The core architecture of the Arduino UNO is relayed on the architecture of AVR with advanced developed Harvard architecture. This architecture separates the flash memory from the data memory. Â
Operating conditions:
â–Â Power consumption: it can depend upon the operating mode.
â–Â Operating voltage: the operating voltage is between 1.8V to 5.5V.
â– Clock speed: The clock speed is up to 20 MHZ but the Audrino UNO mostly runs at 16 MHz.
I/O ports:
â–Â ATmega328P microcontroller has three ports for digital pins which are PORTD, PORTB, and PORTC.
Communication interfaces:
â–Â I2C: for I2C communication, a two-wire interface can be used.
â–Â USART: For serial communication, a universal Synchronous/ Asynchronous receiver/ transmitter can be used.
â–Â SPI: For the transfer of high-speed data peripheral interface can be used.
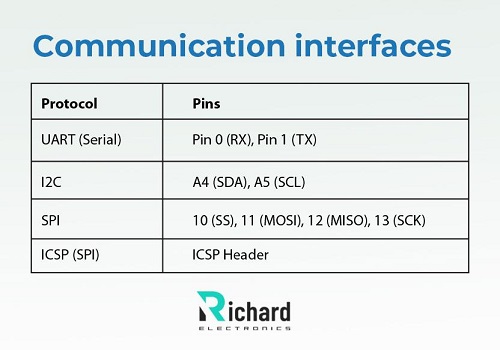
Â
Protocol | Pins |
UART (Serial) | Pin 0 (RX), Pin 1 (TX) |
I2C | A4 (SDA), A5 (SCL) |
SPI | 10 (SS), 11 (MOSI), 12 (MISO), 13 (SCK) |
ICSP (SPI) | ICSP Header |
Â
Arduino UNO Pinout:
For designing electronic circuits, it is crucial to understand the pinout of the Arduino uno efficiently. Generally, the Arduino board has 14 digital pins with 6 analog pins. Now let’s reveal the detail of the pinout of the Arduino Uno microcontroller board:
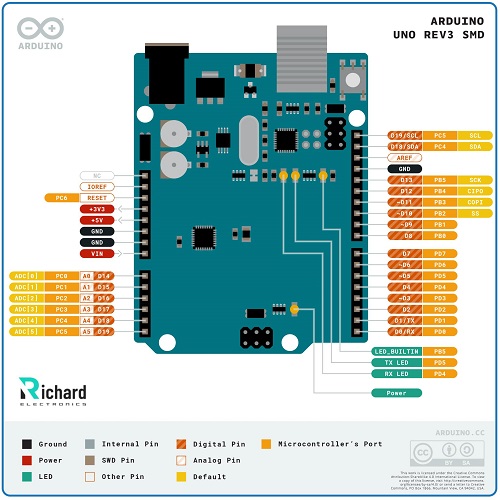
Digital pins I/O: (0-13)
â–Â 0-1 pins: these pins are used for serial communication and are represented as RX (receive) and TX (transmit) respectively. Serial Monitor in Arduino (IDE) is used to display the data on these pins. Moreover, these pins are internally connected to the USB Port of the Arduino board and are used for uploading the programming code.
â–Â 2-13 pins: these pins are cosmopolitan-purpose digital pins. These pins can be designed for input or output by using the pin mode function. However, some pins have many other additional functional capabilities. Some pins with their function are given there:
â—‹Â 3,5,6,9,10,11 pins: these pins can be used for generating a PWM (pulse width modulation) signal by using the analog write function.
â—‹Â 13 pin: An onboard LED is connected with this pin and used for testing purposes.
Power pins:
â–Â RESET: the microcontroller programming can be reset by using this pin.
â–Â 5V: The components on the board and the microcontroller ATmega328P can be powered through this pin because this pin regulates the 5V supply.
â– GND: It provides the circuit’s Ground.
â–Â VIN: when the Arduino uses an external power then this pin gives the input voltage. The voltage recommended to use is between 7V to 12V.
â–Â 3.3V:Â this pin can be used for providing 3.3V to regulate onboard, and is used for powering the lower voltage sensors.
A0-A5 Analog Input pins:
â–Â These pins are used to measure the voltages ranging from 0 -5V, Arduino Uno has 6 (ADC) pins.
Communication Pins:
â–Â UART: PIN 0-1 is used for serial communication with the external modules.
â–Â SPI: Pin 10-13 are used for serial peripheral interface communication. This protocol is widely used for high-speed communication or data transfer from microcontrollers to peripherals like displays and SD cards.
â–Â I2C: A4 and A5 pins are used for I2C communication. These pins allow Arduino to communicate with other devices like EEPROM, RTC etc.
Arduino IDE(Integrated Development Environment):
The Arduino-IDE is a cross-platform software, designed to oversimplify the process of writing, compiling and uploading code to the Arduino boards. Some main aspects and the components of the Arduino integrated development environment are given there:
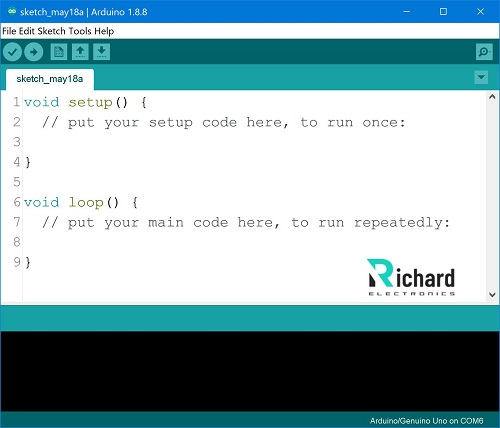
Compiler and uploader:
A compiler is included in Arduino IDE, used to translate the Arduino C sketch into the hex file to upload to the ATmega328P microcontroller. After compiling, the hex file is uploaded to Arduino Uno through the USB conjunction.
Library manager:
The Arduino IDE is also equipped with the library manager, used to install external libraries and helps to make easy integration to external modules.
Code editor:
The IDE has included the text editor for writing the code sketches.
Board manager:
The support for additional boards like ESP32 can be installed with the permission of the board manager and it is also used to update the software of existing boards.
Serial monitor:
This tool is used for communication between your computer and the Arduino board. The serial data sent/received from the microcontroller is displayed through a serial monitor.
Simulating Arduino UNO projects:
Before creating the hardware, the Arduino projects can be simulated by using numerous software tools. The interaction of components with the Arduino board, decoding of the code, and the circuit behavior can be visualized without any physical components through simulation.
Proteus:
â– The simulation tool “Proteus Design Suite†is the best tool to simulate embedded systems, involving Arduino.
â–Â In order to simulate Arduino in Proteus, you need to install this Arduino Library for Proteus.
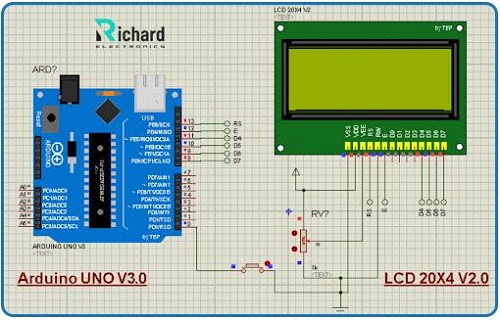
Key Features:
â—Â Code debugging
â—Â Hardware simulation
â—Â High-accuracy simulation for analog signals
â—Â Monitoring of the signals
SimullDE:
â–Â This is also a professional lightweight simulation tool used for the simulation of Arduino or other microcontrollers efficiently. It can allow the founder of the project to simulate the simple circuits and the numerous microcontroller programs.
Key features:
â—Â Decoding tools or having a basic coding interface
â—Â Provide support for display and sensors.
â—Â Simulation of Arduino boards or other circuits with accuracy
Tinkercad circuits:
â–Â This is a free online professional tool that can help and allow you to create and simulate the Arduino circuits. In this, a code editor is present where you can article and then upload the numerous Arduino sketches. This professional tool helps to quickly prototype so it can be widely used by the beginners.
Features:
â—Â Testing and visualizing the circuits
â—Â Code execution tools
â—Â Arduino IDE simulation
â—Â Drag and drop components
Fritzing:
It is an open-source tool that can be designed to help users in designing and simulating the Arduino circuits. the components that can be arranged on the breadboard, their graphical interface can be provided through this tool. It can also help beginners to understand the layout of the circuits efficiently.
Features:
â—Â For circuit designs, PCB views
â—Â Numerous projects with large community
â—Â Code editor for sketches
â—Â PCB designs for manufacturing
Arduino UNO Applications:
â—Â It was designed for educational purposes and is an ideal choice for teachers, learners, hobbyists, electronics, and robotics.
â—Â It offers rapid prototyping of the electronic circuits so the user can test the workings before finalizing the designs.
â—Â The simple structure of this microcontroller makes it possible for hobbyists to utilize it in DIY projects and electronics.
â—Â It can easily be integrated into IoT projects for communication and control.
â—Â It finds its applications in industrial automation, cloud control, home automation, control systems, and many other projects.
Conclusion:
In the world of electronics and embedded systems communities, the Arduino Uno microcontroller board is the front runner due to its advanced and versatile features. In this tutorial, we discussed the Arduino UNO pinout, features, Integrated development environment, and simulation in detail. I hope today's lecture will help beginners to understand the Arduino UNO capabilities. So, now you are ready to get your hands dirty and start programming this board., will meet you guys in the next tutorial. Till then, take care!!!
Smco5 Magnet,Super Rare Earth Smco Magnet,Ring Smco Magnet,Customized Super Rare Earth Smco Magnet
NINGBO GAOTRON MAGNETIC INDUSTRY CO.,LTD , https://www.gaotronmagnet.com